Dedicated servers don’t just cost money; they require IT infrastructure and the support of our IT overlords. Need a Linux based computer to run Shiny Server? Try a virtual machine (VM) instead.
A VM is a program you can run on a normal, everyday computer that pretends to be an entirely different computer. So instead of a dedicated server running a different OS on different hardware, you can just set up a VM to run on your office PC. It can run Linux and act as a server while you carry on making spreadsheets in Windows XP7810.
The VM can also communicate with other computers over the network, if you configure it to do so. In my adventures so far I have used port forwarding to let other computers on the network send requests to my computer, which then passes the requests on to the VM and sends the replies back. It may not work on every network, but hey, it’s worth a try.
The downside to all of this is that the VM is not as fast as a dedicated computer and it will use a portion of the host computer’s RAM and CPU, slowing it down as well.
The (Virtual) Tools
There are a lot of options available for creating VMs and servers. What you pick will depend on what you want to use the VM for. This article recounts what I did to create a Shiny Server using:
- Windows 7 PC with 16GB RAM and 1TB solid state hard drive
- VirtualBox to create and run a VM
- Ubuntu 18.04.3 LTS as the VM OS
Creating the VM
Install VirtualBox and use it to create a new VM. It will ask you to select the OS you will be using. I have used 64bit Ubuntu LTS (18.04).
Before you start the VM look for its “Storage” section in the information panel and click on the [Optical Drive] Empty text.
Put the OS installation .iso file in here and then start the machine to begin installation.
Getting Online - Configure Proxies
The VM will need to update things and download software from online repositories. So the first step after the OS is installed is to configure the VM to use your trust’s proxy server. Go to the Network Settings panel shown below. This can be accessed by opening the Settings application, found by pressing the Show applications button in the bottom left of the screen.
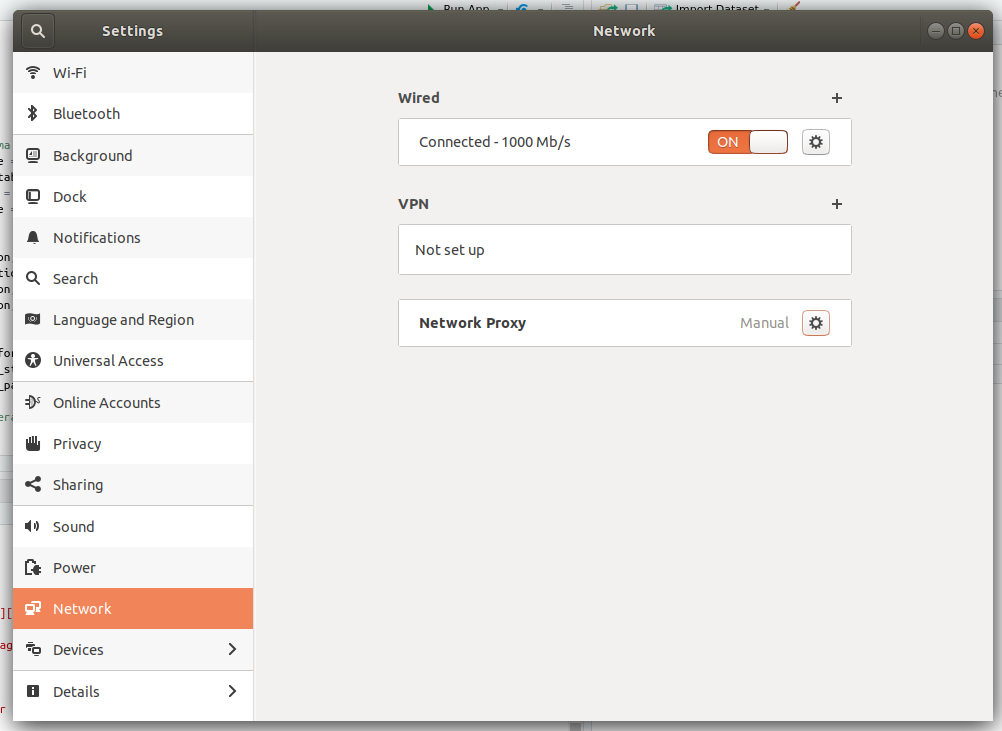
Change the Network Proxy option to Manual
The HTTP and HTTPS proxies can then be set to your_username:your_password@your_proxy and the port number set to the relevent number.
Check this has worked by opening up Firefox (on the task bar on the left of the screen) and looking at a website. If this has not worked, you may need to also set the Firefox settings to use this proxy server. Welcome to Linux, things do not talk to other things in ways you would expect.
If it still does not work, then you may need to ask for some help from IT, or look for someone in your department who has had to fight with proxy server settings before. Lots of software needs these settings to work on a network, so it is not a strange thing to request.
More Proxy configuration
The software that downloads and updates software uses its own proxy settings as well.
You need to edit (or create) a file called apt.conf in the directory etc/apt/apt.conf.d/ and put the proxy settings in by adding the following line (with your settings instead of the placeholder text):
Acquire::http::Proxy "http://your_username:your_password@your_proxy:your_port_number";
That semi-colon on the end is important! I forgot it and nothing worked. Welcome to Linux again.
There are a few different ways to edit text files in Linux. One of the easiest for me is to navigate to the correct directory in the file browser GUI, right click an empty space and select ‘Open in Terminal’. This opens a terminal window to type commands into. Enter the command sudo gedit and the name of the file you want to edit. It will ask you for your password, and it will then open the file to be changed.
If you don’t use the sudo command or open the file by clicking on it in the file browser then the file will be read-only. Welcome to Linux.
MOAR PROXY CONFIGURATION
Another piece of software that downloads things needs telling about the proxy settings. This time the file that needs editting is etc/wgetrc. This has lines for configuring the proxy commented out, so you can just uncomment these and update them with the values you have all ready seen above.
Install VM extras
Getting information in and out of the VM can be annoying. To make shared folders and a shared clipboard work you must install some software in the VM. To install the software in the VM you need to download some tools that are not included in base Ubuntu. Open up a terminal (Alt + Ctrl + T is the fastest way) and try this:
sudo apt update
sudo apt install build-essential
If the proxy settings you configured are good, this should update apt-get’s repository listings and then install the build-essential package. If there is a problem downloading it then the proxy values might still be wrong. Good luck.
Once this installation is complete go to the VM’s Devices menu at the top of the screen. Select the option Insert Guest Addons CD Image... and let this CD auto-run. It should install some stuff and not make error messages. Mine made error messages because I needed to install build-essential, hence the last set of instructions.
Shut down the virtual machine. I mean, power it down with the power button in the top right of the screen, not just close the VM program.
Before you restart it, set up the shared clipboard by clicking on Settings > General > Advanced and set the Shared Clipboard to Bidirectional. You can now copy and paste so entering commands should be 10x easier.
You can also set up shared folders that the VM and your computer can both see and move files into/out of. I’ll do this later, since it is not important yet.
Install R
To install a new version of R (and not the default, old version) we need to add the CRAN repository to the apt-get listings.
To do this we first need to tell apt that the server can be trusted, using a public key. This can be a problem on NHS networks because of ports.
On my network it turned out you need to use the https port for communicating with public key servers, even though the http port should work fine.
This command sorted things out:
sudo add-apt-repository --keyserver hkps://keyserver.ubuntu.com:443 51716619E084DAB9
Aren’t you glad we made copy/paste work?
I am using Ubuntu LTS 18.04, also known as Bionic-Beaver, so the CRAN repository I need is added with
sudo add-apt-repository 'deb https://cloud.r-project.org/bin/linux/ubuntu bionic-cran35/'
If you use a different version of Ubuntu then head here to find out which repo you need to aim apt at.
After the repo is added we must update apt again to download the repository indexes.
sudo apt update
sudo apt install r-base
sudo apt install r-base-dev
You should now have a working version of R installed. Try it out by going to a terminal and just entering the command R. When you are done, use the command q() or quit() to shut down that R session.
Install R Packages
There are a lot of R packages to install, and they need to go to the correct place for shiny server to find them. To install R packages so that everyone can use them start R up with admin rights
sudo R
It will then install packages to usr/local/lib/R/site-library which can be accessed by users with the ‘Staff’ group access rights. This will be important later. Install all of the packages you are likely to need in your shiny server. You will need to install shiny at least, I recommend:
install.packages("rmarkdown, DT, shiny, tidyverse")
Install Shiny Server
Instructions from RStudio are located here
You should just need to run the following:
sudo apt install gdebi-core
wget https://download3.rstudio.org/ubuntu-14.04/x86_64/shiny-server-1.5.12.933-amd64.deb
sudo gdebi shiny-server-1.5.12.933-amd64.deb
See that wget command? That’s why we had to set up the proxy for it. If it can’t find files, the proxy might be causing problems again.
Access Permissions
Installing Shiny Server created a user and a user group called ‘shiny’ that will be used just by the server. This is great, except for this group not having access to most of the system, including the R libraries. My solution to this was to add shiny to the staff user group. This gives it access to the R libraries you made.
To make my life easier, I also added my own user name to the shiny and staff user groups. This allows me to read shiny log files and other stuff that seems like it should just work, but doesn’t. (Because Linux)
sudo usermod -a -G staff shiny
sudo usermod -a -G staff, shiny your_username
Accessing the Shiny
The VM can look at the shiny server by pointing a web browser to 127.0.0.1:3838
To allow the host system and other systems on the network to see the Shiny server we can set up Port forwarding. Shut down the VM and go to its settings in VirtualBox
Go to Network > Advanced > Port Forwarding
Now leave the IP addresses blank, but put 3838 into the host port and guest port.
The shiny server default screen should now be accessible to other systems by opening a web browser and entering the url:
//your_computer_name_or_ip_address:3838
File Transfers
I’m not totally sure how files can be passed between the VM and the host machine. The method that has worked for me (with some hiccups) is to create a shared folder between the two. Open the VM’s options and go to Shared Folders, then add a new one. I ticked the ‘auto-mount’ option so that the folder would be available whenever I rebooted the VM. The folder should now appear on the VM desktop.
When I try to access the folder I have to enter my password at least 2 times, sometimes more. I have not looked into this issue yet. Files that are put into the folder can indeed be seen by both the host system and the VM. This is pretty cool, considering the host is a Windows system and the VM is using Linux. I used this system to copy across an installation file for R-Studio and it worked.